 |
If I was going to mount the fridge in the cabin, I would need
to make sure it was secured so that it would stay put in the event of an accident. I needed a strong foundation
from which to build out the bench extension, and this is it. I custom fit a piece of 2x4 wood to the face of the
existing metal bench utilizing the factory tapped bolt holes that were on both sides. These bolt holes were conveniently
located and just perfect for the task. The top edge of the 2x4 had to be ripped at an angle since the face of the
original bench is sloped. I had to offset the top surface to allow for the new deck material to butt up against the
original deck for a flush surface. I was quite happy that this piece ended up rock solid. |
 |
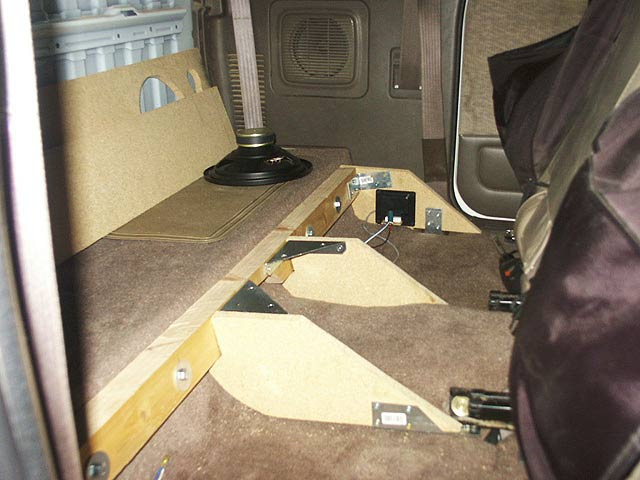
The remainder of the deck extension is made of particle board, of which all
pieces have relatively small dimensions, so I was not as concerned about the
material since the individual surfaces were small or narrow. The deck pieces are held together with various brackets for multiple attachment points
and rigid tie-ins. It took a lot of time to create and shape these pieces, because none of the surfaces of the truck were flat or
square to one another. All of the upright pieces are attached to metal brackets which are fastened to the floor using the factory
seatbelt points and the factory seat slider attachment points. On the far side, you can see where I am attaching the wiring kit
for my speakers which are now removed from their original Kenwood truck boxes. |
|
Unfortunately, I didn't take any pictures of the finished deck surfaces before the carpet went on,
but here is the carpet being trimmed. I found some taupe colored automotive carpet that came vary close to the original Toyota "Oak"
interior carpet scheme. I bought the carpet and adhesive from M&R Upholstery Supplies in Tucson, Arizona, USA. |
 |
|
Here is the new deck with the carpet installed over it. I used a continuous piece of the new carpet
and laid it directly over the existing carpet so there would be no seam and I was trying to avoid a visible difference between the old and the new. I cut a
piece of black rubber gasket material to fit over the hole that was left behind from the removed seat belt holder. I knew it would
be covered by the fridge, so I didn't care so much about how it looked - I was more concerned about trying to keep the road noise out.
You will notice that the speaker holes are not cut from the carpet in this photo. I used a hobby knife to cut a clean
edge, using the holes that I had cut in the deck board as a guide for the blade. I also
had to cut holes for the factory stow
compartments. You can see the lids for the stow compartments in the picture, with the factory carpet still
on them.
|
 |


